This guide provides the steps necessary for administrators to install Red Hat JBoss BRMS, the plug-ins for Red Hat JBoss Developer Studio, and provides instructions for running example projects.
Red Hat JBoss BRMS is an open source decision management platform that combines Business Rules Management and Complex Event Processing. It automates business decisions and makes that logic available to the entire business.
Red Hat JBoss BRMS uses a centralized repository where all resources are stored. This ensures consistency, transparency, and the ability to audit across the business. Business users can modify business logic without requiring assistance from IT personnel.
Business Resource Planner is included with this release.
Red Hat JBoss BRMS is supported for use with Red Hat Enterprise Linux 7 (RHEL7).
Red Hat JBoss BPM Suite and Red Hat JBoss BRMS are supported on the following containers:
Only Drools, Planner, and jBPM engine artifacts can be deployed on Red Hat JBoss Fuse.
Containers marked with an asterisk ( * ) are fully supported and tested. For more information, see a list of Red Hat JBoss BPM Suite 6 Supported Configurations at Red Hat Knowledgebase. Red Hat JBoss Enterprise Application Platform 7.0 is supported only for the Deployable ZIP installation option.
Red Hat JBoss BPM Suite and Red Hat JBoss BRMS 6.4 support the following component versions:
Use one of the following Bill of Materials (BOM):
For further information about BOM, see the Dependency Management chapter of Red Hat JBoss BPM Suite Development Guide .
Red Hat JBoss BRMS comes in two versions:
Depending on your environment, you may choose the installation option best suited for your project needs.
Red Hat JBoss BRMS is designed to work with UTF-8 encoding. If a different encoding system is used by the underlying JVM, unexpected errors might occur. To ensure UTF-8 is used by the JVM, use the following system property: "-Dfile.encoding=UTF-8" .
From Red Hat JBoss BRMS 6.1 onwards, you must have JBoss EAP 6.4 or better already installed before attempting to install Red Hat JBoss BRMS.
The installer for Red Hat JBoss BRMS is an executable Java JAR file. You can use it to install Red Hat JBoss BRMS on an existing Red Hat JBoss EAP 6.4 installation.
Note that the provided Red Hat JBoss BRMS JAR file installer does not support the Red Hat JBoss EAP distribution installed by yum or RPM Package Manager. In this case, download the Red Hat JBoss BRMS 6.4.0 Deployable for EAP 6 file and follow the steps described in Section 2.6, “Installing Red Hat JBoss BRMS on Red Hat JBoss Enterprise Application Platform”.
For security reasons, you should run the installer as a non-root user.
Prerequisite
Before attempting to install Red Hat JBoss BRMS, ensure you have already installed Red Hat JBoss EAP 6, version 6.4.7 or higher, and create a back up. Ensure that your user has sufficient rights to complete the installation.
java -jar jboss-brms-VERSION-installer.jar
When running the installer on Windows, you may be prompted to provide administrator credentials during the installation. To prevent this, add the izpack.mode=privileged option to the installation command:
java -Dizpack.mode=privileged -jar jboss-brms-VERSION-installer.jar
Furthermore, when running the installer with a 32-bit Java Virtual Machine, you can encounter memory limitations. To solve the issue, run
java -XX:MaxHeapSize=4g -jar jboss-brms-VERSION-installer.jar
Make sure that the selected user name does not conflict with any known title of a role or a group. For example, if there is a role called admin , you should not create a user with the user name admin .
The passwords that you create must have at least 8 characters and must contain at least one number and one non-alphanumeric character (not including the character &).
The application role assigned to the second user that you create is the admin role. This is the only role that can be assigned to this newly created user. You can create more users with narrow roles afterwards by using the command line.
The end result is an encrypted connection that is secure between the client and the server for the ManagementRealm.
The Management Console LDAP Configuration screen enables you to set up a security realm. This defines the element to be added to the descriptors, and utilizes the connection defined previously.
Most of the values on the Business Central LDAP Configuration screen are similar to the Base DN values. Contexts are used to search for roles, which enables it to perform authorization in addition to authentication. Otherwise, the context fields are analogous to the Base DN from the previous, and attribute fields are analogous to user name attribute. The filters enable fine grained control over which values of the given attribute will be accepted.
Input values from the Business Central LDAP Configuration page are used to configure a new security domain, which make use of the LdapExtended login module. This security domain is set as default for Business Central web application. For more information about security domains and login modules, see the Red Hat JBoss EAP Security Guide .
You have successfully installed Red Hat JBoss BRMS using the installer.
The installer for Red Hat JBoss BRMS can also be executed through the command-line interface (CLI). The procedure below demonstrates the steps that you are likely to encounter using this option to install Red Hat JBoss BRMS.
Prerequisite
Before attempting to install Red Hat JBoss BRMS, ensure you have already installed Red Hat JBoss EAP 6, version 6.4.7 or higher, and create a back up. Ensure that your user has sufficient rights to complete the installation.
java -jar jboss-brms-VERSION-installer.jar -console
press 1 to continue, 2 to quit, 3 to redisplay.
The location below must specify the JBOSS_HOME of an existing EAP installation. [/home/user/BRMS-VERSION/jboss-eap-6.4]
The installer will verify the location of the Red Hat JBoss EAP installation at the provided location.
press 1 to continue, 2 to quit, 3 to redisplay.
Create an administrative user This user will be added to the host container's management realm for administrative purposes. It can be used to access the management console, the management CLI or other applications secured in this realm. The password must be at least eight characters long, with one alphabetic character, one digit, and one non-alphanumeric character not including &. Create an administrative user. 0 [x] Skip new administrative user creation. 1 [ ] Create a new administrative user.
Admin password: [] ********** Confirm admin password: [**********] **********
press 1 to continue, 2 to quit, 3 to redisplay.
Create a Business Rules Management System Admin User Create a BRMS admin user. The user will be added to the ApplicationRealm, and can be used to access the Business Central Console. The User will be assigned the 'admin' application role. The BRMS username cannot be any of the following: 'admin', 'analyst', 'user', 'manager' or 'developer'. The password must be at least eight characters long, with one alphabetic character, one digit, and one non-alphanumeric character not including &. BRMS username: [brmsAdmin]
Make sure that the selected user name does not conflict with any known title of a role or a group. For example, if there is a role called admin , you should not create a user with the user name admin .
BRMS password: [] ********** Confirm BRMS password: [**********] **********
press 1 to continue, 2 to quit, 3 to redisplay.
A Java security manager offers JVM level security beyond what is provided by the application container. It enforces access rules at the JVM runtime based on one or more security policies. This installer will place two security policies in the installation directory with the filenames 'security.policy' and 'kie.policy' regardless of choice. Those policies will be enabled at runtime if the option below is selected. Please note that a security manager imposes a significant performance overhead when enabled. It is suggested the included policies be applied in production if user requirements call for a stronger measure than what is already provided by the application container's authentication and authorization mechanism. Please see the JBoss Business Rules Management System administrative documentation for further details and consideration. [ ] Enable the Java security manager Input 1 to select, 0 to deselect:
press 1 to continue, 2 to quit, 3 to redisplay.
IPv6 configuration If this computer is using a pure IPv6 configuration, please check the box below. A pure IPv6 setup requires additional configuration at runtime to ensure the proper bindings of the management and http interfaces. [ ] Enable pure IPv6 configuration Input 1 to select, 0 to deselect:
press 1 to continue, 2 to quit, 3 to redisplay.
Configure runtime environment Red Hat JBoss Business Rules Management System can be further customized at this time. 0 [x] Perform default configuration 1 [ ] Perform advanced configuration Input Selection:If you select 1 , Perform advanced configuration , complete the following configurations:
[ ] Install password vault Input 1 to select, 0 to deselect:
[ ] Enable SSL security Input 1 to select, 0 to deselect:
[ ] Secure EAP Management Console with LDAP Input 1 to select, 0 to deselect:
[ ] Secure Business Central and Dashbuilder with LDAP Input 1 to select, 0 to deselect:
[ ] Add a security-domain Input 1 to select, 0 to deselect:
[ ] Install Business-Central Datasource Input 1 to select, 0 to deselect:
[ ] Configure Optaplanner Execution Server Input 1 to select, 0 to deselect:
[ ] Configure KIE Server management Input 1 to select, 0 to deselect:
press 1 to continue, 2 to quit, 3 to redisplay.
Installation has completed successfully. Application installed on /home/user/BRMS-VERSION/jboss-eap-6.4 Would you like to generate an automatic installation script and properties file? (y/n) [n]:
Select path for the automatic installation script: [/home/user/BRMS-VERSION/jboss-eap-6.4/AUTO_SCRIPT_FILENAME]
This generated script will enable the user to run the installer in the following way for future installations:
java -jar jboss-brms-VERSION-installer.jar AUTO_SCRIPT_FILENAME
Running the installer in this way will result in an installation identical to the installation from which the auto script was generated. Note that sensitive values, such as passwords, will need to be provided from an external file or provided at auto installation time. The optional argument below enables the user to provide these values automatically:
-variablefile VARIABLE_FILENAMESensitive values can also be provided using the following argument:
-variables key1=value1,key2=value2
XML written successfully. [ Console installation done ] [BRMS_Installer]$
./standalone.sh
If the installer detects Red Hat JBoss BRMS applications, the installation will not continue. In case of a failed installation:
To install Red Hat JBoss BRMS 6.4 deployable on Red Hat JBoss EAP 6.4 or later, perform the following tasks:
If you already have deployments on your Red Hat JBoss EAP, ensure that your current deployments do not have colliding names with Red Hat JBoss BRMS deployments.
Make sure this step is performed by the same user account that was used to install Red Hat JBoss EAP. This account must not be a superuser account.
./EAP_HOME/bin/add-user.sh -a --user bpmsAdmin --password password@1 --role kie-server,admin,rest-all,analyst
./standalone.shIn a Windows environment:
standalone.bat
You can now log into Business Central in your web browser: localhost :8080/business-central .
If you installed Red Hat JBoss BRMS as described in Section 2.2, “Downloading Red Hat JBoss BRMS for Red Hat JBoss EAP”, deploy Red Hat JBoss BRMS web applications manually.
The business-central.war , dashbuilder.war , and kie-server.war applications are supplied in the Red Hat JBoss BRMS 6.4.0 Deployable for EAP 6 ZIP file as directories. To deploy the applications into domain mode:
cd business-central.war
./EAP_HOME/bin/add-user.sh -b --user mgmtAdmin --password password@1 --role admin
If you want to deploy multiple Red Hat JBoss BRMS nodes on a single machine, set ports and other properties before assigning the deployment to a server. See the section called “Red Hat JBoss BRMS Settings for Red Hat JBoss EAP” for more information.
You can now log into Business Central at localhost :8080/business-central .
To log into Business Central deployed on Host Controller (HC) machines, the user created on the Domain Controller machine has to be created on the Host Controller machines as well, by following the steps in Section 2.9, “Creating Users”.
If you want to run multiple instances of Red Hat JBoss EAP with Red Hat JBoss BRMS, the best practice is to meaningfully set the following properties:
When multiple Red Hat JBoss BRMS nodes are used on a single machine, the below properties need to be specified:
Both the org.uberfire.nio.git.daemon.port and the org.uberfire.nio.git.ssh.port require different port values in order to avoid port conflicts.
Set the properties in the EAP_HOME /domain/configuration/host.xml file:
The system properties depicted above should indicate the host, port, or location of the .index or .niogit files. These files, which should be used by a respective node, would then be grouped in a particular domain.
The generic deployable package is provided for customers to install Red Hat JBoss BRMS 6.4 to an existing application server. The following procedure provides instructions for installation on an existing Red Hat JBoss Web Server 2.1.0 instance.
In a fresh Red Hat JBoss BRMS installation, you can encounter exceptions in the log similar to the following:
WARNING: Unable to instantiate EJB Asynchronous Bean. Falling back to Executors' CachedThreadPool.
The exceptions are caused by the code that failed to look up an Enterprise Java Beans object registered under a JNDI name that does not exist in Apache Tomcat. Therefore, a default implementation is used instead.
These messages are only warnings and do not have any impact on the overall functionality of the system.
Procedure: Installing Generic Deployable Package
Make sure that the selected user name does not conflict with any known title of a role or a group. See Section 2.8, “Defining Roles” for a list of defined roles. For example, if there is a role called admin , you should not create a user with the user name admin .
Please note that the following section describes the setup of a transaction manager, Bitronix, that is not officially supported by Red Hat.
Copy the following transaction manager JAR libraries from the lib folder to $ TOMCAT_DIR /lib/ directory. These JARs are available in jboss-brms- VERSION -deployable-generic.zip and jboss-brms- VERSION -engine.zip .
Additionally, download the following library and copy it into the $ TOMCAT_DIR /lib/ folder: javax.security.jacc-api.jar.
Add Valve configuration into TOMCAT_HOME /conf/server.xml inside the element as last Valve definition:
bitronix.tm.serverId=tomcat-btm-node0 bitronix.tm.journal.disk.logPart1Filename=$/work/btm1.tlog bitronix.tm.journal.disk.logPart2Filename=$/work/btm2.tlog bitronix.tm.resource.configuration=$/conf/resources.propertiesExample 2.1. H2 Data Source Definition
resource.ds1.className=bitronix.tm.resource.jdbc.lrc.LrcXADataSource resource.ds1.uniqueName=jdbc/jbpm resource.ds1.minPoolSize=10 resource.ds1.maxPoolSize=20 resource.ds1.driverProperties.driverClassName=org.h2.Driver resource.ds1.driverProperties.url=jdbc:h2:file:~/jbpm resource.ds1.driverProperties.user=sa resource.ds1.driverProperties.password= resource.ds1.allowLocalTransactions=trueExample 2.2. MySQL 5.5 Data Source Definition
resource.ds1.className=com.mysql.jdbc.jdbc2.optional.MysqlXADataSource resource.ds1.uniqueName=jdbc/jbpm resource.ds1.minPoolSize=0 resource.ds1.maxPoolSize=10 resource.ds1.driverProperties.URL=jdbc:mysql://localhost:3306/sampledb resource.ds1.driverProperties.user=dbuser resource.ds1.driverProperties.password=dbpassword resource.ds1.allowLocalTransactions=trueExample 2.3. DB2 Type 4 Data Source Definition
resource.ds1.className=com.ibm.db2.jcc.DB2Driver resource.ds1.uniqueName=jdbc/jbpm resource.ds1.minPoolSize=0 resource.ds1.maxPoolSize=10 resource.ds1.driverProperties.URL=jdbc:db2://localhost:50000/sampledb resource.ds1.driverProperties.user=dbuser resource.ds1.driverProperties.password=dbpassword resource.ds1.allowLocalTransactions=trueExample 2.4. Oracle Data Source Definition
resource.ds1.className=oracle.jdbc.xa.client.OracleXADataSource resource.ds1.uniqueName=jdbc/jbpm resource.ds1.minPoolSize=0 resource.ds1.maxPoolSize=10 resource.ds1.driverProperties.URL=jdbc:oracle:thin:@//localhost:1521/bpms resource.ds1.driverProperties.user=dbuser resource.ds1.driverProperties.password=dbpassword resource.ds1.allowLocalTransactions=trueExample 2.5. Microsoft SQL Server Data Source Definition
resource.ds1.className=com.microsoft.sqlserver.jdbc.SQLServerDriver resource.ds1.uniqueName=jdbc/jbpm resource.ds1.minPoolSize=0 resource.ds1.maxPoolSize=10 resource.ds1.driverProperties.URL=jdbc:sqlserver://localhost:1433;databaseName=bpms; resource.ds1.driverProperties.user=dbuser resource.ds1.driverProperties.password=dbpassword resource.ds1.allowLocalTransactions=true
This information can be updated in the following manner (as demonstrated with MySQL database below):Console DS jdbc/myDatasource javax.sql.DataSource Container
The dialect for DB2 is org.hibernate.dialect.DB2Dialect , for DB2 on AS/400 is org.hibernate.dialect.DB2400Dialect , for Oracle is org.hibernate.dialect.Oracle10gDialect , and for Microsoft SQL Server is org.hibernate.dialect.SQLServerDialect .
Change this value to the data source defined earlier:java:comp/env/jdbc/jbpm
java:comp/env/jdbc/myDatasource
CATALINA_OPTS="-Xmx512M -XX:MaxPermSize=512m -Djava.security.auth.login.config=$CATALINA_HOME/webapps/business-central/WEB-INF/classes/login.config -Dbtm.root=$CATALINA_HOME -Dbitronix.tm.configuration=$CATALINA_HOME/conf/btm-config.properties -Dorg.jbpm.designer.perspective=RuleFlow -Djbpm.tsr.jndi.lookup=java:comp/env/TransactionSynchronizationRegistry -Dorg.jboss.logging.provider=jdk -Dorg.jbpm.server.ext.disabled=true -Dorg.jbpm.ui.server.ext.disabled=true"
The property org.jbpm.designer.perspective is set to RuleFlow to allow the default perspective for the designer to be RuleFlow rather than Full . Grant the file execute permissions if applicable.
The -XX:MaxPermSize=512m JVM property is valid only for JDK 6 and 7. It is not valid for JDK 8+.On Microsoft Windows systems, replace the $ CATALINA_HOME value in the content of the file with the equivalent environment variable name, or use the absolute path and add the values in setenv.bat file as shown here in the following example:
set "CATALINA_OPTS=-Xmx512m -XX:MaxPermSize=512m -Djava.security.auth.login.config=C:\apache-tomcat\webapps\business-central\WEB-INF\classes\login.config -Dbtm.root=C:\apache-tomcat -Dbitronix.tm.configuration=C:\apache-tomcat\conf\btm-config.properties -Dorg.jbpm.designer.perspective=RuleFlow -Djbpm.tsr.jndi.lookup=java:comp/env/TransactionSynchronizationRegistry -Dorg.jbpm.server.ext.disabled=true -Dorg.jbpm.ui.server.ext.disabled=true"Driver to Embedded H2 Database If using the embedded H2 database, the driver is available in business-central/WEB-INF/lib/ .
./startup.sh
After setting up Business Central, it is necessary to configure data sources for the Realtime Decision Server ( kie-server ) as well. Otherwise, Realtime Decision Server tries to find a data source under the JNDI jboss/datasources/ExampleDS , which is by default registered only in Red Hat JBoss EAP and not in Apache Tomcat.
Realtime Decision Server requires a data source only if the jBPM extension is enabled. This extension is enabled by default.
Realtime Decision Server needs a dedicated database, which is why it is not possible to reuse the data source registered for Business Central. To add a dedicated data source for kie-server , do the following:
resource.ds2.className=bitronix.tm.resource.jdbc.lrc.LrcXADataSource resource.ds2.uniqueName=jdbc/kieserver resource.ds2.minPoolSize=10 resource.ds2.maxPoolSize=20 resource.ds2.driverProperties.driverClassName=org.h2.Driver resource.ds2.driverProperties.url=jdbc:h2:file:~/bpm630tomcat7kieserver resource.ds2.driverProperties.user=sa resource.ds2.driverProperties.password= resource.ds2.allowLocalTransactions=true
-Dorg.kie.server.persistence.ds=java:comp/env/jdbc/kieserver -Dorg.kie.server.persistence.tm=org.hibernate.service.jta.platform.internal.BitronixJtaPlatform
Before starting the server and logging in to Business Central, you will need to create some user accounts. This section describes the different user roles that are used in Red Hat JBoss BRMS:
Enter the above mentioned roles during the user creation process.
To start adding new users, you will need to run the add-user.sh script on a Unix system or the add-user.bat file on a Windows system from the Red Hat JBoss EAP bin directory.
Procedure: Creating New Users
./add-user.shOn a Windows system, run:
./add-user.bat
Make sure that the selected user name does not conflict with any known title of a role or a group. For example, if there is a role called admin , you should not create a user with the user name admin .
The password should be at least 8 characters in length and should contain upper and lower case alphabetic characters (A-Z, a-z), at least one numerical character (0-9) and at least one special character (for example ~ ! @ # $ % ^ * ( ) - _ + =).
Red Hat JBoss BRMS is configured to use an example data source with Java Naming and Directory Interface (JNDI) name java:jboss/datasources/ExampleDS . The example data source is not suitable for production.
To change the data source:
psql jbpm < /tmp/ddl/postgresql/postgresql-jbpm-schema.sql
./jboss-cli.sh (no need to actually connect to the server) module add --name=org.postgresql --resources=/path/to/postgresql-jdbc-driver.jar --dependencies=javax.api,javax.transaction.api
./jboss-cli.sh --connect --controller=HOST:PORT /subsystem=datasources/jdbc-driver=postgresql:add(driver-name=postgresql,driver-module-name=org.postgresql,driver-xa-datasource-class-name=org.postgresql.xa.PGXADataSource) xa-data-source add --driver-name=postgresql --password=SOME_PASSWORD --user-name=SOME_USERNAME --xa-datasource-properties=url=jdbc:postgresql://localhost:5432/jbpm --name=PostgresqlDS --jndi-name=java:jboss/datasources/PostgresqlDS
Always use a distributed (XA) data source with the JBoss BPM Suite persistence service. In general, you should use an XA data source when multiple resources are involved in a single transaction. For example, if you are using a Java Messege Service (JMS) executor (which is used by default when asynchronous tasks are included) or timers based on Quartz, you should use an XA data source.
java:jboss/datasources/PostgresqlDS
If you want to use an IBM DB2 database as the underlying data source for Business Central, increase the page size for the database. The default page size of 4 kB is not sufficient for the Dashbuilder table columns size.
When creating the database, force the page size to 16384 as in the example below:
Example 3.1. Adjusting Page Size
CREATE DATABASE dashb PAGESIZE 16384
This increase in page size for the underlying database must be performed before the Red Hat JBoss BPM Suite has been run for the first time.
Non-English characters are not displayed in Dashbuilder
If you want to use UTF 8 to display non-English characters, set the encoding at the level of database for Dashbuilder to work correctly. For example, in MySQL, add the following to the server configuration file:
[mysqld] character-set-server=utf8 collation-server=utf8_general_ci
Deadlocks occur with Microsoft SQL Server If you are using Microsoft SQL Server, make sure you have configured proper transaction isolation for your database. If you do not, you may experience deadlocks. The recommended configuration is to turn on ALLOW_SNAPSHOT_ISOLATION and READ_COMMITTED_SNAPSHOT by entering the following statements:
ALTER DATABASE SET ALLOW_SNAPSHOT_ISOLATION ON ALTER DATABASE SET READ_COMMITTED_SNAPSHOT ONOracle 11 produces multiple warnings without any cause
When you use Oracle 11 as the data source, multiple warning ( WARN ) messages are produced in the logs without any corresponding Business Central activity being performed. This is expected behavior. To turn off these messages, set the level of the org.hibernate.loader category of the logger to ERROR in the standalone.xml file:
Git is a distributed version control system and it implements revisions as commit objects. Every time when you commit your changes into a repository this creates a new commit object in the Git repository. Similarly, the user can also copy an existing repository. This copying process is typically called cloning and the resulting repository can be referred to as clone. Every clone contains the full history of the collection of files and a cloned repository has the same functionality as the original repository.
The local repository consists of three "trees" maintained by Git as shown in the following figure:
The following table provides with a summary of important Git terminology.
A branch is a named pointer to a commit. Selecting a branch in Git terminology is called to checkout a branch. If you are working in a certain branch, the creation of a new commit advances this pointer to the newly created commit. Each commit knows their parents (predecessors). Successors are retrieved by traversing the commit graph starting from branches or other refs, symbolic reference (for example HEAD) or explicit commit objects. This way a branch defines its own line of descendants in the overall version graph formed by all commits in the repository. You can create a new branch from an existing one and change the code independently from other branches. One of the branches is the default (typically named master ). The default branch is the one for which a local branch is automatically created when cloning the repository.
When you commit your changes into a repository this creates a new commit object in the Git repository. This commit object uniquely identifies a new revision of the content of the repository. This revision can be retrieved later, for example, if you want to see the source code of an older version. Each commit object contains the author and the committer, thus making it possible to identify who did the change. The author and committer might be different people. The author did the change and the committer applied the change to the Git repository.
HEAD is a symbolic reference most often pointing to the currently checked out branch. Sometimes the HEAD points directly to a commit object, this is called detached HEAD mode. In that state creation of a commit will not move any branch. The first predecessor of HEAD can be addressed through HEAD~1 , HEAD~2 and so on. If you switch branches, the HEAD pointer moves to the last commit in the branch. If you checkout a specific commit, the HEAD points to this commit.
Index is an alternative term for the staging area.
A repository contains the history, the different versions over time and all different branches and tags. In Git each copy of the repository is a complete repository. If the repository is not a bare repository, it allows you to checkout revisions into your working tree and to capture changes by creating new commits. Bare repositories are only changed by transporting changes from other repositories. This tutorial uses the term repository to talk about a non bare repository. If it talks about a bare repository, this is explicitly mentioned.
Represents a version of the source code. Git implements revisions as commit objects (or short commits). These are identified by an SHA-1 secure hash. SHA-1 IDs are 160 bits long and are represented in hexadecimal notation.
The staging area is the place to store changes in the working tree before the commit. The staging area contains the set of the snapshots of changes in the working tree (change or new files) relevant to create the next commit and stores their mode (file type, executable bit).
A tag points to a commit which uniquely identifies a version of the Git repository. With a tag, you can have a named point to which you can always revert to. You can revert to any point in a Git repository, but tags make it easier. The benefit of tags is to mark the repository for a specific reason, for example with a release. Branches and tags are named pointers, the difference is that branches move when a new commit is created while tags always point to the same commit. Technically, a tag reference can also point to an annotated tag object.
A URL in Git determines the location of the repository. Git distinguishes between fetchurl for getting new data from other repositories and pushurl for pushing data to another repository.
The working tree contains the set of working files for the repository. You can modify the content and commit the changes as new commits to the repository.
Import projects from an existing Git repository in Red Hat JBoss Developer Studio (see Section 8.5, “Importing Projects from Git Repository into Red Hat JBoss Developer Studio”).
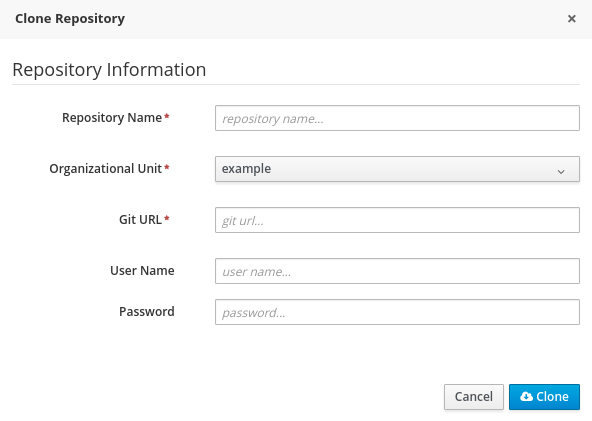
An existing Git repository can be cloned and used in Red Hat JBoss BRMS.
Procedure: Cloning Repository
To migrate data from Red Hat JBoss BRMS 5, do the following:
./runMigration.sh -i SOURCE_PATH -o DESTINATION_PATH -r REPOSITORY_NAMEIn a Windows environment, run:
./runMigration.bat -i SOURCE_PATH -o DESTINATION_PATH -r REPOSITORY_NAME
The repository is then migrated to the specified location.
Authentication and user management is handled by the application server that Red Hat JBoss BRMS has been installed to. Users should see the application server documentation for more information.
If you installed Red Hat JBoss BRMS using the generic deployable package on Red Hat Java Web Server, Section 2.6, “Installing Red Hat JBoss BRMS on Red Hat JBoss Enterprise Application Platform” contains the instructions for starting the server. You can ignore the following discussion.
Once the Red Hat JBoss BRMS server is installed on Red Hat JBoss EAP, you can run it either in the standalone or the domain mode.
If you chose the deployable ZIP package for Red Hat JBoss EAP, the configuration steps are described in Section 2.2, “Downloading Red Hat JBoss BRMS for Red Hat JBoss EAP”.
The default startup script, standalone.sh , is optimized for performance. To run your server in the performance mode, do the following:
./standalone.shIn a Windows environment, run:
./standalone.bat
If you used the JAR installer, Red Hat JBoss BRMS is already configured for running in the domain mode.
If you chose the deployable ZIP package for Red Hat JBoss EAP, the configuration steps for domain mode are described in Section 2.2, “Downloading Red Hat JBoss BRMS for Red Hat JBoss EAP”.
To start Red Hat JBoss BRMS in the domain mode, perform the following steps:
./domain.shIn a Windows environment, run:
./domain.bat
Red Hat JBoss BRMS ships with a standard security policy, located in the kie.policy file. The location of this file varies depending on your distribution. In order to use the Kie Policy for Java Security Manager, the application server must have its security manager activated. For Red Hat JBoss EAP 6.x or better, it is started using a valid security.policy file specified at java.security.policy and a valid kie.policy file specified at kie.security.policy .
This applies to all containers, even when using the rule and process engine in embedded mode.
If you installed Red Hat JBoss BRMS using the installer, an option to apply the security policy is given to you at the time of installation. Applying the security policy using the installer will modify the standalone.conf file to include the security.policy and kie.policy security policies in the JBOSS_HOME/bin folder. These policies will be enabled at runtime using standalone.sh .
Red Hat JBoss BRMS provides standalone-secure.sh , a separate script that is optimized for security. The script applies a security policy by default that protects against a known security vulnerability.
The standalone-secure.sh script is only available when using the Red Hat JBoss EAP Deployable package.
It is recommended to use the standalone-secure.sh script in production environments.
The use of a security manager imposes a significant performance penalty that you should be aware of. The tradeoff between security and performance must be made by taking into consideration individual circumstances. See Section 6.2.1, “Java Security Manager and Performance Management”.
To run your server in the secure mode, do the following:
./standalone-secure.shIn a Windows environment, run:
./standalone-secure.bat
If you are using Red Hat JBoss EAP in version 7, the standalone-secure.sh script is no longer available. To enable the security manager, start the server with the -secmgr and -Dkie.security.policy=./kie.policy flags. For example:
./standalone.sh -secmgr -Dkie.security.policy=./kie.policy
For further information about Java Security Manager in Red Hat JBoss EAP 7, see chapter Java Security Manager of Red Hat JBoss Enterprise Application Platform: How to Configure Server Security .
Complete the following procedure to enable Security Manager for an embedded application running on Red Hat JBoss EAP 7.
grant < permission java.security.AllPermission; >;
As noted earlier, enabling the Java Security Manager (JSM) to sandbox the evaluation of MVEL scripts in Red Hat JBoss BRMS introduces a performance hit in high load environments. Environments and performance markers must be kept in mind when deploying a Red Hat JBoss BRMS application. Use the following guidelines to deploy secure and high performance Red Hat JBoss BRMS applications.
Allowing users with analyst role to log in to the Business Central console with JSM disabled is not secure and not recommended.
Log into Business Central after the server has successfully started.
When you log into Business Central, it is possible that the Loading… screen does not disappear. This can be caused by your firewall interfering with Server Sent Events (SSE) used by Business Central.
To work around the problem, disable SSE usage by the Business Central:
You can create two types of Red Hat JBoss BRMS clusters:
Design-Time ClusteringAllows you to share assets in the Git repository, such as processes, rules, data objects, and others, with all the Red Hat JBoss BRMS nodes in your cluster. It is suitable in case of concerns about a single point of failure and high availability during the development process. Design-time clustering makes use of Apache Helix and Apache ZooKeeper .
Design-time clustering is not required for runtime execution.
Runtime Clustering Allows you to use the clustering capabilities of your container, such as Red Hat JBoss EAP. Runtime clustering does not require you to manage any Apache Helix or Apache ZooKeeper nodes. Quartz Enterprise Job Scheduler is supported if you use timers in your application.
If you use the Websphere Application Server, Quartz setup is not necessary. Instead, use clustered EJB Timers. For more information, see the How to setup BPM Suite Timers to work in Websphere Application Server clustering support article.
You can cluster the following components of Red Hat JBoss BRMS:
To cluster the Git repository, Red Hat JBoss BRMS uses:
Apache HelixProvides cluster management functionality that allows you to synchronize and replicate data among the nodes in your cluster. Apache Helix cluster is managed by Apache ZooKeeper. With Apache Helix, you can define a cluster, add nodes to the cluster, remove nodes from the cluster, and perform other cluster-management tasks.
Allows you to synchronize and replicate data from the Apache Helix cluster. An Apache ZooKeeper cluster is known as an ensemble and requires a majority of the servers to be functional for the service to be available.
However, an ensemble is not required for any type of clustering. Only a single instance of ZooKeeper is required to allow Red Hat JBoss BRMS to replicate its data; the ZooKeeper ensemble serves to provide redundancy and protect against the failure of ZooKeeper itself.
The relationship between Apache Helix and Apache ZooKeeper:
Figure 6.1. Schema of Red Hat JBoss BRMS Cluster
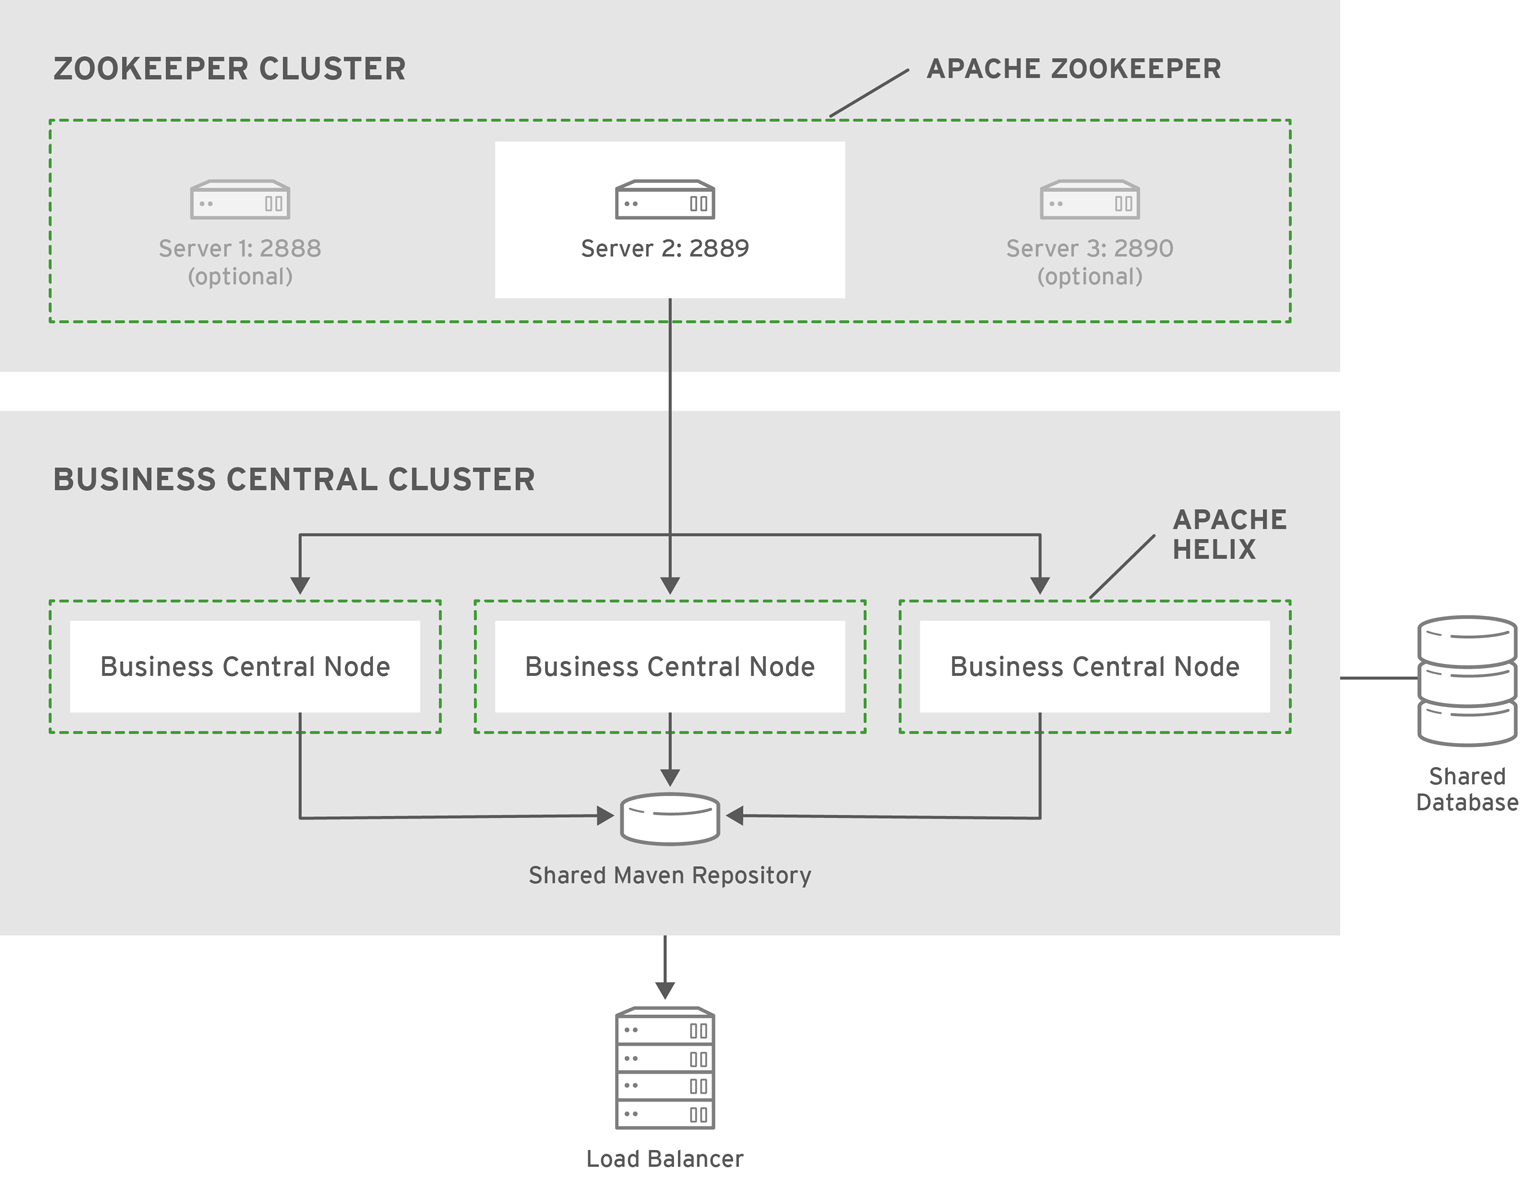
A typical clustering setup involves the following:
Various Business Central operations publish JAR files to the Business Central’s internal Maven Repository.
This repository exists on the application server file-system as regular files and is not cluster aware. This folder is not synchronized across the various nodes in the cluster and must be synchronized using external tools like rsync .
An alternative to the use of an external synchronization tool is to set the system property org.guvnor.m2repo.dir on each cluster node to point to a SAN or NAS. In such case, clustering of the Maven repository folder is not needed.
To install Red Hat JBoss BRMS in the clustered mode, the JAR installer provides a sample setup. You can configure clustering with the deployable ZIP for EAP as well.
The JAR installer provides sample setup only. Adjusting the configuration is necessary for it to suit your project’s needs.
Using the JAR installer, you can set up a basic clustering configuration of Red Hat JBoss BRMS.
The automatic configuration creates:
This Red Hat JBoss BRMS setup consists of two EAP nodes that share a Maven repository, use Quartz for coordinating timed tasks, and have business-central.war , dashbuilder.war , and kie-server.war deployed. To customize the setup to fit your scenario, or to use clustering with the deployable ZIP, see Section 6.5.4, “Custom Configuration (Deployable ZIP)” and the clustering documentation of your container.
The installer copies the JAR(s) into EAP_HOME /modules and creates corresponding module.xml file.
During the installation, Quartz DDL scripts will be run on the database selected in this step. The scripts make changes needed for Quartz to operate, such as adding tables. You can view the scripts in EAP_HOME /jboss-brms-bpmsuite-6.4-supplementary-tools/ddl-scripts . No modifications should be necessary.
When using the JAR installer, the war archives are automatically created from the applications in EAP_HOME /standalone/deployments/ . That means additional space is necessary as the applications exist both in uncompressed and compressed state in the storage during the installation.
After the installation finishes, do not start the server from the installer. To make Apache Helix aware of the cluster nodes, Apache ZooKeeper instances, and start the cluster:
./startCluster.shOn Windows:
./startCluster.bat
./domain.shOn Windows:
./domain.bat
The startCluster.sh script in EAP_HOME /jboss-brms-bpmsuite-6.4-supplementary-tools/helix-core initializes and starts the cluster. Once initialized, further usage of startCluster.sh results in errors. If you installed Red Hat JBoss BRMS cluster with the installer:
To start a cluster:
./ZOOKEEPER_HOME_ONE/bin/zkServer.sh start & ./ZOOKEEPER_HOME_TWO/bin/zkServer.sh start & ./ZOOKEEPER_HOME_THREE/bin/zkServer.sh start &On Windows:
ZOOKEEPER_HOME_ONE/bin/zkServer.cmd start ZOOKEEPER_HOME_TWO/bin/zkServer.cmd start ZOOKEEPER_HOME_THREE/bin/zkServer.cmd start
./HELIX_HOME/bin/run-helix-controller.sh --zkSvr localhost:2181,localhost:2182,localhost:2183 --cluster bpms-cluster 2>&1 > /tmp/controller.log &
./domain.shOn Windows:
./domain.bat
localhost:8080/business-central localhost:8230/business-central
To stop your cluster, stop the components in the reversed order from starting it:
ps aux|grep HelixControllerMainOnce you have the PID, terminate the process: kill -15
./ZOOKEEPER_HOME_ONE/bin/zkServer.sh stop ./ZOOKEEPER_HOME_TWO/bin/zkServer.sh stop ./ZOOKEEPER_HOME_THREE/bin/zkServer.sh stopOn Windows:
ZOOKEEPER_HOME_ONE/bin/zkServer.cmd stop ZOOKEEPER_HOME_TWO/bin/zkServer.cmd stop ZOOKEEPER_HOME_THREE/bin/zkServer.cmd stop
When using Red Hat JBoss EAP clustering, a single Red Hat JBoss EAP domain controller exists with other Red Hat JBoss EAP slaves connecting to it as management users. You can deploy Business Central and dashbuilder as a management user on a domain controller, and the WAR deployments will be distributed to other members of the Red Hat JBoss EAP cluster.
To configure clustering on Red Hat JBoss EAP 6, do the following:
| Values | Default |
|---|---|
| String | N/A |
org.uberfire.cluster.id The name of the Helix cluster, for example: kie-cluster . You must set this property to the same value as defined in the Helix Controller.
| Values | Default |
|---|---|
| String | N/A |
org.uberfire.cluster.local.id The unique ID of the Helix cluster node. Note that ':' is replaced with '_', for example node1_12345 .
| Values | Default |
|---|---|
| String | N/A |
org.uberfire.cluster.vfs.lock The name of the resource defined on the Helix cluster, for example: kie-vfs .
| Values | Default |
|---|---|
| String | N/A |
| Values | Default |
|---|---|
| String of the form host1:port1 , host2:port2 , host3:port3 ,… | N/A |
org.uberfire.metadata.index.dir The location of the .index directory, which Apache Lucene uses when indexing and searching.
| Values | Default |
|---|---|
| Path | Current working directory |
org.uberfire.nio.git.daemon.host If the Git daemon is enabled, it uses this property as the localhost identifier.
| Values | Default |
|---|---|
| URL | localhost |
org.uberfire.nio.git.daemon.hostport When running in a virtualized environment, the host’s outside port number for the Git daemon.
| Values | Default |
|---|---|
| Port number | 9418 |
org.uberfire.nio.git.daemon.port If the Git daemon is enabled, it uses this property as the port number.
| Values | Default |
|---|---|
| Port number | 9418 |
org.uberfire.nio.git.dir The location of the directory .niogit . Change the value for example for backup purposes.
| Values | Default |
|---|---|
| Path | Current working directory |
org.uberfire.nio.git.ssh.host If the SSH daemon is enabled, it uses this property as the localhost identifier.
| Values | Default |
|---|---|
| URL | localhost |
org.uberfire.nio.git.ssh.hostport When running in a virtualized environment, the host’s outside port number for the SSH daemon.
| Values | Default |
|---|---|
| Port number | 8003 |
org.uberfire.nio.git.ssh.port If the SSH daemon is enabled, it uses this property as the port number.
| Values | Default |
|---|---|
| Port number | 8001 |
./domain.shOn Windows:
./domain.bat
Deploy the Business Central application to your servers:
It is important users explicitly check deployment unit readiness with every cluster member.
When a deployment unit is created on a cluster node, it takes some time before it is distributed among all cluster members. Deployment status can be checked using the UI and REST, however, if the query goes to the node where the deployment was originally issued, the answer is deployed . Any request targeting this deployment unit sent to a different cluster member fails with DeploymentNotFoundException .
The Realtime Decision Server is a lightweight and scalable component. Clustering it provides many benefits. For example:
The basic runtime cluster consists of:
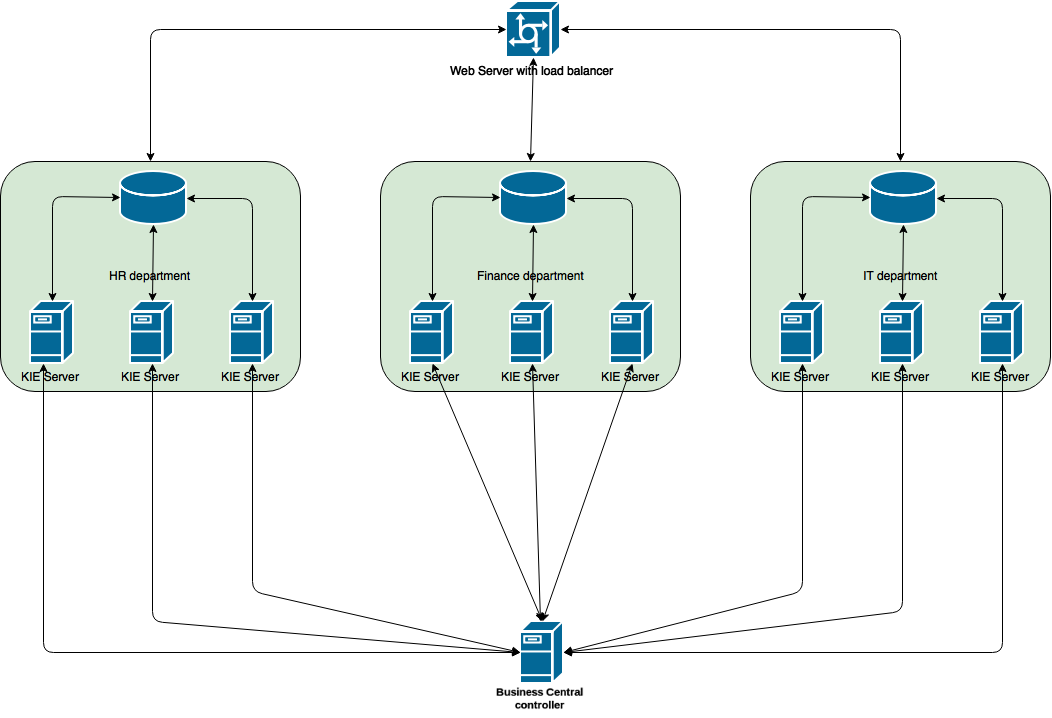
This section describes how to start Realtime Decision Server cluster on Red Hat JBoss EAP 6.4.
Creating a Realtime Decision Server Cluster
$ ./add-user.sh -a --user kieserver --password kieserver1! --role kie-server
$ ./standalone.sh
org.kie.server.location : URL of the server instance. org.kie.server.controller : Comma-separated list of the controller URL(s).1 2 3 4 5
org.kie.server.controller.user : Username you created for controller authentication. Uses kieserver by default.
org.kie.server.controller.pwd : Password for controller authentication. Uses kieserver1! by default.org.kie.server.id : Server identifier that corresponds to template ID defined by the controller instance. Give the same ID to multiple server instances that represent one template.
$ ./SERVER_HOME/bin/domain.sh
After connecting the servers to your controller, check the controller log:
13:54:40,315 INFO [org.kie.server.controller.impl.KieServerControllerImpl] (http-localhost/127.0.0.1:8080-1) Server http://localhost:8180/kie-server/services/rest/server connected to controller 13:54:40,331 INFO [org.kie.server.controller.impl.KieServerControllerImpl] (http-localhost/127.0.0.1:8080-2) Server http://localhost:8230/kie-server/services/rest/server connected to controller 13:54:40,348 INFO [org.kie.server.controller.rest.RestKieServerControllerImpl] (http-localhost/127.0.0.1:8080-1) Server with id 'HR' connected 13:54:40,348 INFO [org.kie.server.controller.rest.RestKieServerControllerImpl] (http-localhost/127.0.0.1:8080-2) Server with id 'HR' connected
Alternatively, to verify in controller Business Central:
If you do not use Business Central, skip this section.
To cluster your Git (VFS) repository in Business Central:
cp zoo_sample.cfg zoo.cfg
# The directory where the snapshot is stored. dataDir=$ZOOKEEPER_HOME/data/ # The port at which the clients connects. clientPort=2181 # Defining ZooKeeper ensemble. # server.=: server.1=localhost:2888:3888 server.2=localhost:2889:3889 server.3=localhost:2890:3890Multiple ZooKeeper nodes are not required for clustering.
echo "1" > /zookeeper/data/myid
./zkServer.sh start
./helix-admin.sh --zkSvr server1:2181,server2:2182,server3:2183 --addNode brms-cluster nodeOne:12345 ./helix-admin.sh --zkSvr server1:2181,server2:2182,server3:2183 --addNode brms-cluster nodeTwo:12346 ./helix-admin.sh --zkSvr server1:2181,server2:2182,server3:2183 --addNode brms-cluster nodeThree:12347helix-admin.sh --zkSvr ZOOKEEPER_HOST:ZOOKEEPER_PORT --addResource Learn more about state machine configuration at Helix Tutorial: State Machine Configuration. Example 6.5. Adding vfs-repo as Resource
./helix-admin.sh --zkSvr server1:2181,server2:2182,server3:2183 --addResource brms-cluster vfs-repo 1 LeaderStandby AUTO_REBALANCEhelix-admin.sh --zkSvr ZOOKEEPER_HOST:ZOOKEEPER_PORT --rebalance Learn more about rebalancing at Helix Tutorial: Rebalancing Algorithms. Example 6.6. Rebalancing brms-cluster
./helix-admin.sh --zkSvr server1:2181,server2:2182,server3:2183 --rebalance brms-cluster vfs-repo 3Example 6.7. Starting Helix Controller
./run-helix-controller.sh --zkSvr server1:2181,server2:2182,server3:2183 --cluster brms-cluster 2>&1 > ./controller.log &
In case you decide to cluster ZooKeeper, add an odd number of instances in order to recover from failure. After a failure, the remaining number of nodes still need to be able to form a majority. For example a cluster of five ZooKeeper nodes can withstand loss of two nodes in order to fully recover. One ZooKeeper instance is still possible, replication will work, however no recover possibilities are available if it fails.
Note: To configure the number of retries and delay for the Quartz trigger, you can update the following system properties:
Apache Maven is a distributed build automation tool used in Java application development to build and manage software projects. Maven uses configuration XML files called POM (Project Object Model) to define project properties and manage the build process. POM files describe the project’s module and component dependencies, build order, and targets for the resulting project packaging and output. This ensures that projects are built in a correct and uniform manner.
Maven uses repositories to store Java libraries, plug-ins, and other build artifacts. Repositories can be either local or remote. A local repository is a download of artifacts from a remote repository cached on a local machine. A remote repository is any other repository accessed using common protocols, such as http:// when located on an HTTP server, or file:// when located on a file server. The default repository is the public remote Maven 2 Central Repository.
Configuration of Maven is performed by modifying the settings.xml file. You can either configure global Maven settings in the M2_HOME /conf/settings.xml file, or user-level settings in the USER_HOME /.m2/settings.xml file.
For more information about Maven, see the Welcome to Apache Maven page.
For more information about Maven repositories, see the Apache Maven Project — Introduction to Repositories article.
For more information about Maven POM files, see Apache Maven Project — POM Reference.
Your Red Hat JBoss product has been built with Maven 3.0. x . Therefore, this is the recommended Maven version for building your own SwitchYard applications.
A set of repositories containing artifacts required to build applications based on Red Hat JBoss BRMS is provided with this release. Maven must be configured to use these repositories and the Maven Central Repository in order to provide correct build functionality.
Two interchangeable sets of repositories ensuring the same functionality are provided. The first set is available for download and storage in a local file system, the second set is hosted online for use as remote repositories.
The set of online remote repositories is a technology preview source of components. As such, it is not in scope of patching and is supported only for use in development environment. Using the set of online repositories in production environment is a potential source of security vulnerabilities and is therefore not a supported use case. For more information, see the JBoss Enterprise Maven Repository.
Overview
In situations where you cannot use the online repositories, you will have to download and configure the required repositories locally.
brms-bpms-local-profile jboss-brms-bpmsuite-repository BRMS/BPMS 6.4.0 GA Repository file:///jboss-brms-bpmsuite-6.4.0.GA-maven-repository/maven-repository default true never false never jboss-brms-bpmsuite-repository BRMS/BPMS 6.4.0.GA Repository file:///jboss-brms-bpmsuite-6.4.0.GA-maven-repository/maven-repository default true never false never brms-bpms-m2-repo admin admin httpclient true brms-bpms-m2-repo --> Authorization Basic YWRtaW46YWRtaW4= brms-bpms-local-profile
Result
The Maven repositories are downloaded, unzipped in a local file system, registered in Maven’s ~/.m2/settings.xml file, and ready to be used when performing Maven builds.
To use the Maven Central Repositories offline,perform a KJAR build in the Maven online environment, then copy the ~/.m2/repository folder to the offline environment.
When you build or deploy a project, it fails with one or both of the following errors:
Your cached local Maven repository might contain outdated artifacts.
To resolve the issue, delete the cached local repository — the ~/.m2/repository/ directory on Linux or the %SystemDrive%\Users\USERNAME\.m2\repository\ directory on Windows — and run mvn clean install -U . This will force Maven to download correct versions of required artifacts when performing the next build.
You have updated your Maven configuration, but this configuration is not reflected in Red Hat JBoss Developer Studio.
If Red Hat JBoss Developer Studio is running when you modify your Maven settings.xml file, this configuration will not be reflected in Red Hat JBoss Developer Studio.
Refresh the Maven settings in the IDE. From the menu, choose Window → Preferences . In the Preferences window, expand Maven and choose User Settings . Click the Update Settings button to refresh the Maven user settings in Red Hat JBoss Developer Studio.

The online repositories required for Red Hat JBoss BRMS applications are located at https://maven.repository.redhat.com/ga/.
It is possible to configure Maven to use online repositories using the project’s POM file, but this is not recommended.
Procedure: Configuring Maven to Use Online Repositories
Figure 7.1. Update Maven User Settingsbrms-bpms-online-profile jboss-ga-repository https://maven.repository.redhat.com/ga/ true false jboss-ga-plugin-repository https://maven.repository.redhat.com/ga/ true false brms-bpms-m2-repo admin admin httpclient true brms-bpms-m2-repo --> Authorization Basic YWRtaW46YWRtaW4= brms-bpms-online-profile
Result
Maven has been configured to use the online repositories provided for your Red Hat JBoss product.
If your cached local Maven repository contains outdated artifacts, you may encounter one of the following Maven errors when you build or deploy your project:
To resolve the issue, delete the cached local repository — the ~/.m2/repository/ directory on Linux or the %SystemDrive%\Users\USERNAME\.m2\repository\ directory on Windows — and run mvn clean install -U . This will force Maven to download correct versions of required artifacts when performing the next build.
In order to use the correct Maven dependencies in your Red Hat JBoss BRMS project, you must add relevant Bill Of Materials (BOM) files to the project’s pom.xml file. Adding the BOM files ensures that the correct versions of transitive dependencies from the provided Maven repositories are included in the project.
To use the Red Hat JBoss BRMS Maven artifacts, you need to configure one of the following:
The Maven Central online repository, which is also required, is configured by default in Maven. It has to be reachable for your project to function properly, even if you selected the local Maven repository.
Depending on your project requirements, declare one of the following the dependencies in your POM file in the dependencies section. For further information about the versions, see the Supported Component Versions chapter of Red Hat JBoss BPM Suite Installation Guide .
Red Hat JBoss Developer Studio is the JBoss Integrated Development Environment (IDE) based on Eclipse. Get the latest Red Hat JBoss Developer Studio from the Red Hat Customer Portal. Red Hat JBoss Developer Studio provides plug-ins with tools and interfaces for Red Hat JBoss BRMS and Red Hat JBoss BPM Suite. These plugins are based on the community version of these products. So, the Red Hat JBoss BRMS plug-in is called the Drools plug-in and the Red Hat JBoss BPM Suite plug-in is called the jBPM plug-in.
See the Red Hat JBoss Developer Studio documentation for installation and setup instructions.
Due to an issue in the way multi-byte rule names are handled, you must ensure that the instance of JBoss Developer Studio is started with the file encoding set to UTF-8. You can do this by editing the $ JBDS_HOME /studio/jbdevstudio.ini file and adding the following property: "-Dfile.encoding=UTF-8" .
The Drools plug-ins for Red Hat JBoss Developer Studio are available on the update site.
Procedure: Installing the Drools Red Hat JBoss Developer Studio Plug-in
To use the Red Hat JBoss BRMS and Red Hat JBoss BPM Suite plug-ins with Red Hat JBoss Developer Studio, you must set up the runtimes.
A runtime is a collection of JAR files that represents a specific release of the software and provides libraries needed for compilation and running of your business assets.
Procedure: Configuring Red Hat JBoss BRMS and Red Hat JBoss BPM Suite Runtimes
Red Hat JBoss Developer Studio can be configured to run the Red Hat JBoss BRMS Server.
Procedure: Configuring Server
You can configure Red Hat JBoss Developer Studio to connect to a central Git asset repository. The repository stores rules, models, functions, and processes.
You can either clone a remote Git repository or import a local Git repository.
Procedure: Cloning Remote Git Repository
/sbin/service sshd start
Procedure: Importing Local Git Repository
Business Resource Planner is a lightweight, embeddable planning engine that optimizes planning problems. It helps normal Java™ programmers solve planning problems efficiently, and it combines optimization heuristics and metaheuristics with very efficient score calculations.
Planner helps solve various use cases like the following:
./runExamples.shIn a Windows environment, run the following command:
./runExamples.bat
Red Hat JBoss BRMS patches can be either an asynchronous update, or a planned update:
To download Red Hat JBoss BRMS patches:
The following files are included as part of a Red Hat JBoss BRMS and Red Hat JBoss BPM Suite patch release.
6.4 Update 6 introduces a small change into the database schema. You must apply the bpms-6.4-to-7.0.sql script to your database before you run Red Hat JBoss BPM Suite or Red Hat JBoss BRMS 6.4.6. This script is located in the upgrade-scripts/ directory, available from the Red Hat JBOSS BPM Suite 6.4 Update 6 and the Red Hat JBOSS BRMS 6.4 Update 6 zip files which you can download from the Red Hat Customer Portal.
In Red Hat JBoss BRMS, the client patching tool is distributed as a ZIP file that includes .sh and .bat scripts, allowing for easy and automatic application of updates to an existing Red Hat JBoss BRMS 6.1 (or better) installation.
The patching tool is for use with Red Hat JBoss BRMS 6.1 or better, and should not be used for earlier versions. For more information, see the Maintenance Release Changes in BRMS and BPM Suite 6.1+ article at Red Hat Knowledgebase.
Patch updates should not be applied while you are running an instance of Red Hat JBoss BRMS. Make sure that the server is shut down before running the following command.
The script requires two mandatory parameters: and . For example, the following command applies the updates to the specified Red Hat JBoss EAP 6.4 bundle:
$ ./apply-updates.sh ~/EAP_HOME/jboss-eap-6.4 eap6.x
The following command applies the updates to the specified Red Hat JBoss EAP 7.0 bundle:
$ ./apply-updates.sh ~/EAP_HOME/jboss-eap-7.0 eap7.x
The following distribution types are supported:
The quickstarts and migration tool are also included in the patch and are available for download as a ZIP file.
Only updates for Red Hat JBoss BRMS or Red Hat JBoss BPM Suite are included in the patch distribution. Patches to EAP itself must be applied using the EAP patching mechanism. See the Red Hat JBoss EAP Installation Guide.
Before applying any updates, the client script takes a backup of the specified distribution. It copies the distribution file or directory into the backup/CURRENT_TIMESTAMP subdirectory. The top-level backup directory is created at the same filesystem level as the apply-updates script.
The client patching tool provides a blacklist feature that allows you to tell the script the files that must not be updated. This is a feature that helps you preserve your configuration files from being overwritten automatically by the update process. You can specify non-configuration files as well if required.
To specify the blacklisted files, open the file blacklist.txt present within the patch distribution. Enter the relative path to the files that must not be updated. Each file must be specified on a line by itself.
# Lines with a '#' are comment lines, like this one. # Blank lines are ignored. # We have made changes to the web.xml that must be preserved: WEB-INF/web.xml # This file has custom modifications: styles/base.css
Files specified in the blacklist.txt file that have updated content in the patch, are not touched by the update tool. Instead, the tool copies the new, updated file in the same location and appends the new suffix to it. For example, after running the patch tool, both these files will exist in the styles folder, continuing with the blacklist.txt file in the example above.
$ ls styles base.css base.css.new
Now, compare the contents of the two files and merge the changes.
If there are files that are no longer being distributed but you want to preserve them, put them into the blacklist.txt file as well. The patch update tool will not delete these files, and instead create an empty marker file with the suffix removed . You can then choose to either keep or delete these files manually.
Continuing with the previous example, if the base.css file was removed and you had this file listed in the blacklist.txt file, then after the patch tool has run, the contents of the styles directory would be similar to:
$ ls styles base.css base.css.removed
Use the following commands for updating other supported platforms and common applications in Red Hat JBoss BRMS.
On a Microsoft Windows system, run ./apply-updates.bat instead of ./apply-updates.sh .
Patch EAP 6. x Business Central WAR
$ ./apply-updates.sh PATH/jboss-eap-6.4/standalone/deployments/business-central.war eap6.x-bc
Patch EAP 7. x Business Central WAR
$ ./apply-updates.sh PATH/jboss-eap-7.0/standalone/deployments/business-central.war eap7.x-bc
Patch EAP 6. x KIE Server WAR
$ ./apply-updates.sh PATH/jboss-eap-6.4/standalone/deployments/kie-server.war eap6.x-kie-server
Patch EAP 7. x KIE Server WAR
$ ./apply-updates.sh PATH/jboss-eap-7.0/standalone/deployments/kie-server.war eap7.x-kie-server
Patch Generic KIE Server WAR
$ ./apply-updates.sh PATH_TO_TOMCAT_HOME/webapps/kie-server.war generic-kie-server
Patch Whole WebLogic 12c Bundle
$ ./apply-updates.sh PATH_TO_UNZIPPED_wlsc12c_BUNDLE wls12c
Patch Planner Engine Bundle
$ ./apply-updates.sh PATH_TO_UNZIPPED_PLANNER_BUNDLE planner-engine
Patch IBM WebSphere Application Server Bundle
$ ./apply-updates.sh PATH_TO_UNZIPPED_WAS_BUNDLE was8
When patching the IBM WebSphere Application Server, do not extract the target WAR files.
Apart from supporting upgrade to the latest micro release, Red Hat JBoss BRMS also supports upgrading between minor releases. For example, upgrading from:
The Red Hat JBoss BRMS upgrade tool is distributed as ZIP files with naming convention that states the upgrade path. For example, jboss-brms-6.2.2-to-6.3.0-patch.zip is used to upgrade from 6.2. x to the 6.3.0 version. These ZIP files can be downloaded from the Red Hat Customer Portal:
Each ZIP file contains the following scripts:
To upgrade to the next minor release using these upgrade scripts, you must specify arguments indicating the path of distribution and the type of distribution you want to upgrade in your command:
$ ./apply-updates.sh DISTRIBUTION_PATH DISTRIBUTION_NAME
$ ./apply-updates.sh ~/EAP_HOME/jboss-eap-6.4 eap6.x
The supported distribution types are:
The upgrade tool allows you to upgrade the entire distribution, or only a part of the distribution as per your requirement. For example, for the eap6. x distribution, you can choose to patch the entire eap6. x or choose to patch any of the war files ( eap6. x -bc , eap6. x -kie-server ) that the patch contains.
Note that the upgrade tool does not upgrade the configuration files if you have your custom updates in them. The upgrade tool checks if the configuration files have any changes. If there are no changes made to the configuration files, the tool replaces the configuration files with the latest version. However, if the tool finds custom changes made to any of the configuration files, it adds those files to blacklist, and does not replace them with the latest version. So you do not need to manually compare the configuration files and place them in the blacklist to ensure that your custom configurations are intact.
It is recommended that you add your custom changes to the .new files instead of trying to update the current configuration files with changes from the new Red Hat JBoss BRMS version. For example, if you have custom changes such as data source name/location in the persistence.xml file, the recommended approach is to add your custom changes to the .new files created by the upgrade tool. Once you have updated the .new files with all the required changes, rename them to their original names (without the .new suffix). This ensures that the applications pick the updated configuration files containing your custom changes.
Documentation last updated on: Wednesday, Oct 23, 2019.
The text of and illustrations in this document are licensed by Red Hat under a Creative Commons Attribution–Share Alike 3.0 Unported license ("CC-BY-SA"). An explanation of CC-BY-SA is available at http://creativecommons.org/licenses/by-sa/3.0/. In accordance with CC-BY-SA, if you distribute this document or an adaptation of it, you must provide the URL for the original version.
Red Hat, as the licensor of this document, waives the right to enforce, and agrees not to assert, Section 4d of CC-BY-SA to the fullest extent permitted by applicable law.
Red Hat, Red Hat Enterprise Linux, the Shadowman logo, the Red Hat logo, JBoss, OpenShift, Fedora, the Infinity logo, and RHCE are trademarks of Red Hat, Inc., registered in the United States and other countries.
Linux ® is the registered trademark of Linus Torvalds in the United States and other countries. Java ® is a registered trademark of Oracle and/or its affiliates.XFS ® is a trademark of Silicon Graphics International Corp. or its subsidiaries in the United States and/or other countries.
MySQL ® is a registered trademark of MySQL AB in the United States, the European Union and other countries.
Node.js ® is an official trademark of Joyent. Red Hat is not formally related to or endorsed by the official Joyent Node.js open source or commercial project.
The OpenStack ® Word Mark and OpenStack logo are either registered trademarks/service marks or trademarks/service marks of the OpenStack Foundation, in the United States and other countries and are used with the OpenStack Foundation's permission. We are not affiliated with, endorsed or sponsored by the OpenStack Foundation, or the OpenStack community.